Easy-to-use Code Blocks in WordPress
- Development
- Lubos Kmetko
- 4 min read

Create easy-to-use code blocks in WordPress with ACF, Timber and Prism.js
Entering code blocks in the WordPress posts can be inconvenient at times. The article Posting Code Blocks on a WordPress describes various methods such as entering code blocks manually in the Text mode editor, using markdown, or using a 3rd party plugin.
In this tutorial, which was inspired by a reader comment in the article, we will demonstrate how you can easily create easy-to-use code blocks in WordPress using ACF, Timber and Prism.js.
The method consists of creating code blocks with the ACF’s repeater field and entering them as shortcodes into the post. Prism.js will help us with the code highlighting.
Looking to optimise your WordPress website?

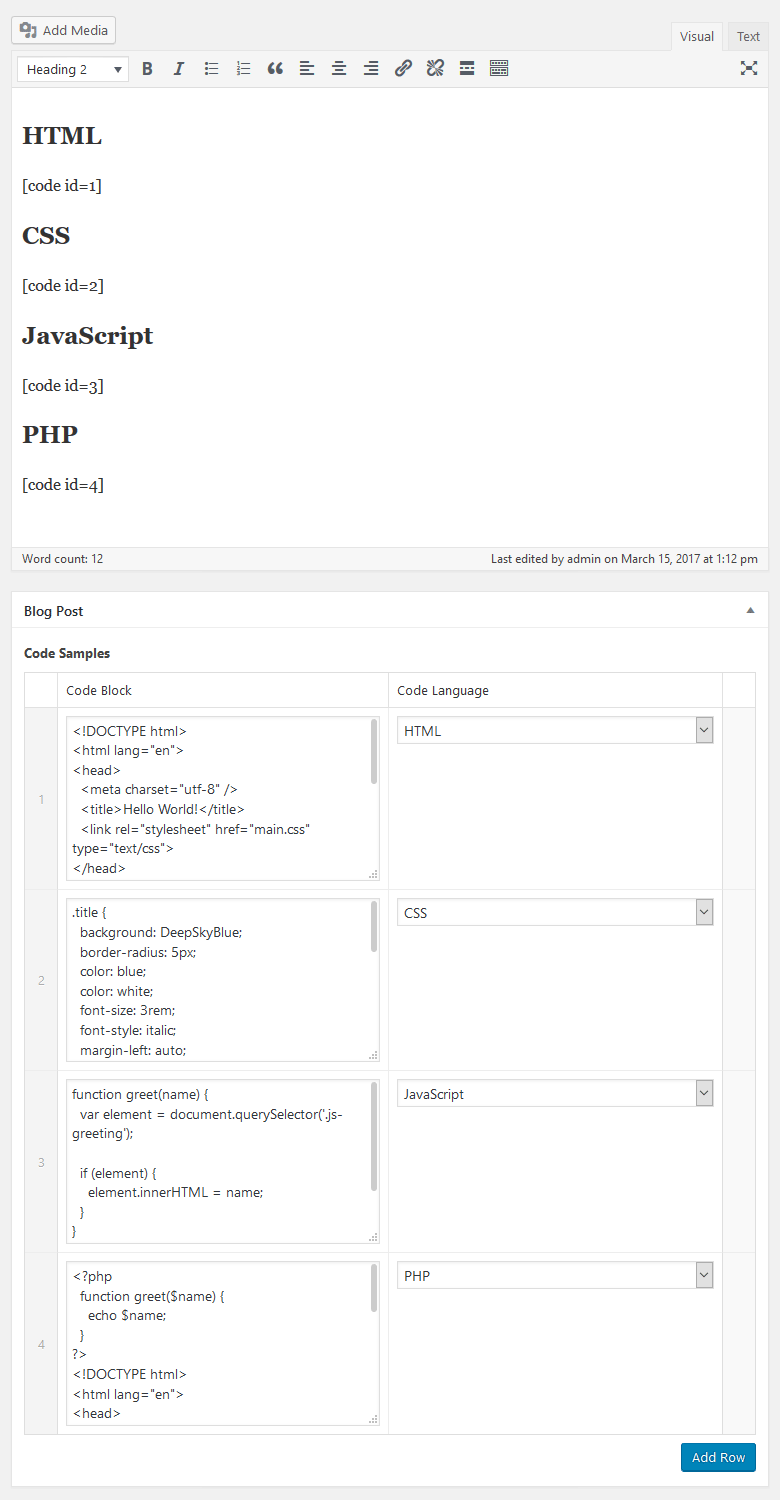
This is how using code blocks will look like in the WordPress admin:

You can see how they display on the blog post in this live preview.
Setup
Let’s start with a WordPress setup using Chisel. It should be pretty straightforward, just don’t forget to select the ACF plugin.
If you need more information on Chisel and how to get it setup, check out our other tutorials:
Setting up code blocks with ACF
First, you will need ACF Pro, a paid version of Advanced Custom Fields plugin, which contains Repeater Field.
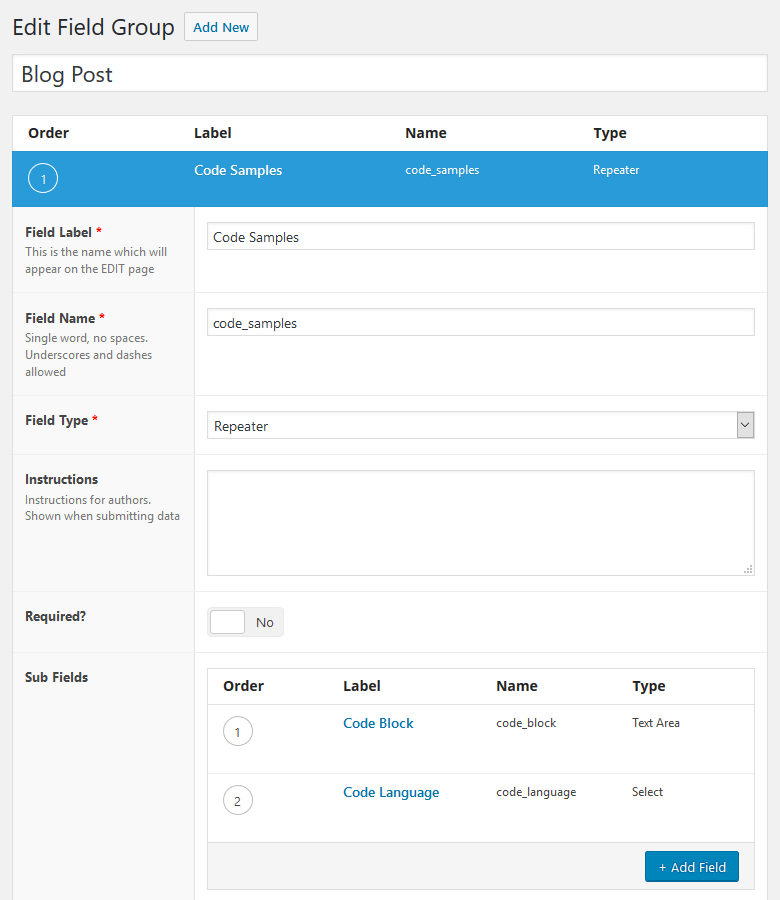
Then, create a new field group which will be displayed in the blog posts. Add the Code samples field, which will be the Repeater type.

Now, add two subfields:
- Code Block
- Code Language
Code Block will be Textarea type, with New Lines options set to No formatting
Code Language will be Select type, with the following Choices:
markup : HTML
css : CSS
javascript : JavaScript
php : PHP
Getting and displaying code blocks with Timber
Copy the following code to single.php
<?php
/**
 * The Template for displaying all single posts
 */

$context = Timber::get_context();

// Get code samples
$samples = get_field('code_samples', $post->ID);

// If there are any code samples, process their shortcodes
if ($samples) {
	add_shortcode('code', function($atts) use ($samples) {
		if (isset($atts['id'])) {
			$id = sanitize_text_field($atts['id']);
			$sample = $samples[$id - 1];
		} else {
			$sample = false;
		}
		return Timber::compile('components/code-sample.twig', array('sample' => $sample));
	});
}

Timber::render( array( 'single-' . $post->ID . '.twig', 'single-' . $post->post_type . '.twig', 'single.twig' ), $context );
First, we get code samples for the post. If there are any, we will add a hook for our shortcode tag “code.” If found, run an anonymous PHP function to which we’ll pass a shortcode attribute – an ID of the code sample.
Then, in order to fetch the particular sample from the all post samples, we will pass the samples variable to it by the use keyword.
Finally we will return formatted code sample using Timber’s compile method. This will process the components/code-sample.twig Twig template and return its output.
{% if sample %}
<pre><code class="language-{{sample.code_language}}">{{sample.code_block|escape}}</code></pre>
{% endif %}
It’s important to use the compile method instead of the render method because shortcode cannot produce any output. It can only return text which will replace the shortcode in the post content.
Styling code blocks with Prism
Now, we will add code highlighting using Prism.js. Start by running the following command from your project folder:
npm install --save prismjsThen, delete existing content of the src/scripts/app.js file and add:
require('prismjs');
require('prismjs/components/prism-php');
By default, Prism comes with built-in highlighting for HTML, CSS, JavaScript and C-like languages. To add support for other languages, simply require additional components like we did with PHP above.
To add the required CSS, import it from the installed Node module in the main.scss:
@import 'prismjs/themes/prism';We can import styles this way because the node_modules folder is in the Sass path in Chisel.
Finally, to build the project, run:
npm run buildAdding code blocks in posts
Adding code blocks in posts should now be easy. First, add a new row to your code blocks, paste the code to the textarea, and select the code language.
Then, use the shortcode with the relevant id in the blog post content editor. The advantage here is that you can still use the editor in the Visual mode and it won’t mess up your formatting. You can even use code blocks in the lists and such.
The slight disadvantage could be that you have to scroll between the content and code blocks. However, I have used this method on this blog in articles with up to 10 code blocks and it’s not that big issue.


